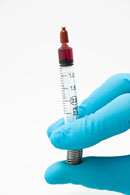
The Solaronix' Vac'n'Fill Syringe is a must-have tool for every Dye Solar Cell experimenter!
The difficulty of the filling procedure has been a frequent issue reported to us by our customers. This step is not always as easy at it seems, especially on small laboratory cells used for research.
Solaronix has come up with an easy solution for the delicate assembly step of electrolyte filling.
The Vac'n'Fill Syringe is an easy to use device for making a vacuum in a solar cell cavity and back filling the cavity with a liquid electrolyte. A simple fix for a very common issue at an affordable cost.
What's more, it works very well with our solar cell kits. It's a perfect tool for educational purpose and training course classrooms.
Look no further, the Vac'n'Fill Syringe works with virtually any Dye Solar Cell assembly where a liquid electrolyte must be filled through one or more holes in the counter electrode.
1. Load and purge


Push the syringe to the maximum, dip the tip in your electrolyte, and gently release the spring in order to take up about 0.5 mL of solution.
Place the syringe's tip upright and press the cylinder until no air or bubbles remain in the electrolyte solution (use a tissue to absorb excess of liquid). Hold this position for the next step so that air doesn't get back into the syringe.
2. Vacuum, wait


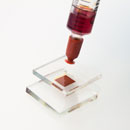
Keeping the cylinder compressed, apply the red rubber tip to the electrode hole.
Slowly release the spring. The resulting suction creates a vacuum in the solar cell's cavity, which may be visible by the evolution of bubbles through the reservoir of electrolyte.
Hold this position for a few seconds, allowing the air to leave the inside of the cell.
3. Fill, release


Once the air is removed from the cell, slowly press the syringe down. The pressure on the electrolyte and the vacuum in the cell's cavity pushes and pulls the liquid inside the solar cell.
Press the spring down until the entire cavity is filled with electrolyte. This technique leaves almost no bubbles between the two electrodes. Repeat the vacuum/fill cycle if necessary.
Continue to depress the syringe while removing the suction tip from the electrode hole. Don't release the syringe's spring before the tip is off the glass to prevent drawing the electrolyte out.
Voila! Your solar cell is filled with electrolyte, just seal the hole and it's ready to go.
- Dimensions :
- L 13.5 cm, diam. 1 cm
- Material :
- polypropylene (PP) syringe, with stainless steel spring, and red rubber tip.
- Variant :
- 2 mL
1. Load and purge


Push the syringe to the maximum, dip the tip in your electrolyte, and gently release the spring in order to take up about 0.5 mL of solution.
Place the syringe's tip upright and press the cylinder until no air or bubbles remain in the electrolyte solution (use a tissue to absorb excess of liquid). Hold this position for the next step so that air doesn't get back into the syringe.
2. Vacuum, wait


Keeping the cylinder compressed, apply the red rubber tip to the electrode hole.
Slowly release the spring. The resulting suction creates a vacuum in the solar cell's cavity, which may be visible by the evolution of bubbles through the reservoir of electrolyte.
Hold this position for a few seconds, allowing the air to leave the inside of the cell.
3. Fill, release


Once the air is removed from the cell, slowly press the syringe down. The pressure on the electrolyte and the vacuum in the cell's cavity pushes and pulls the liquid inside the solar cell.
Press the spring down until the entire cavity is filled with electrolyte. This technique leaves almost no bubbles between the two electrodes. Repeat the vacuum/fill cycle if necessary.
Continue to depress the syringe while removing the suction tip from the electrode hole. Don't release the syringe's spring before the tip is off the glass to prevent drawing the electrolyte out.
Voila! Your solar cell is filled with electrolyte, just seal the hole and it's ready to go.


 Swiss Made - Solaronix is a Licensee of EPFL
